Flow marks (or flow lines) are common defects in injection molding. They are complex and varied, and today we primarily discuss two common types: wave flow marks and jetting marks.
If you are interested in other injection molding defects, please click the link below to learn more.
Definition of Flow Marks
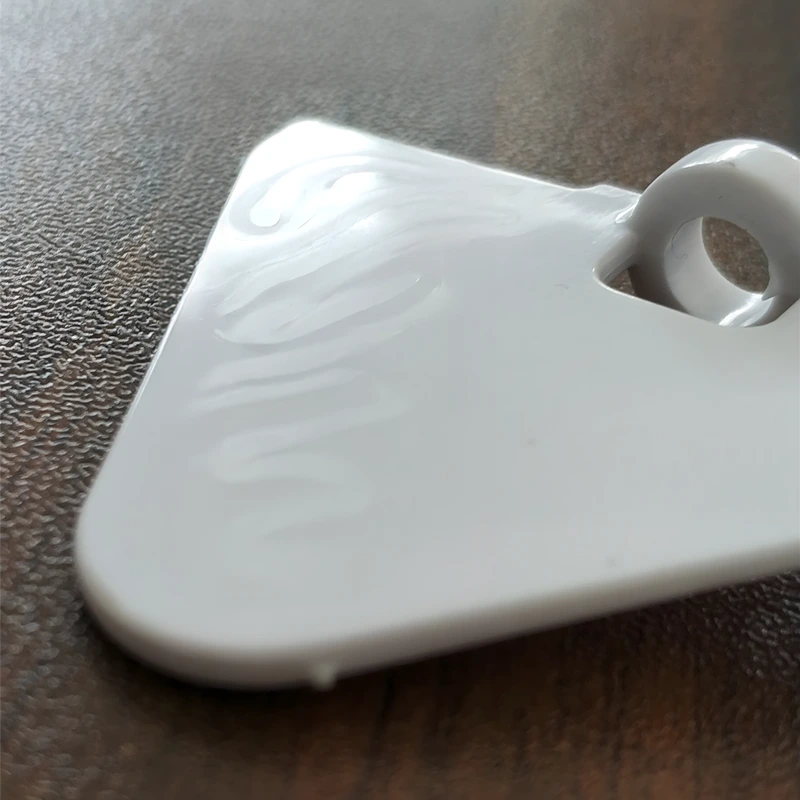
The definition of flow marks is quite broad and can generally be considered as irregular patterns on the product surface caused by irregular flow speeds of the molten plastic in the mold cavity. Usually, people refer to flow marks as phenomena where the surface of the molded part produces concentric, spiral, or cloud-like wavy patterns centered around the gate.
As shown in the following diagram, based on the 注射速度 of the plastic, several types of flow marks can occur, including wave flow marks and jetting marks which are our main focus today.

Causes of Wave Flow Marks
The reasons for wave flow marks mainly include:

1. Small gate and runner cross-sectional area
If the gate and runner cross-sectional area of the mold is too small, it increases the filling resistance, preventing the smooth flow of the melt and resulting in wave marks. To address this, it is advisable to enlarge the gate and runner cross-sectional area.
2. Improper design of cold slug wells
If cold material enters the cavity, it can produce wave marks. Therefore, large cold slug traps should be placed at the ends of the main and sub-runners of the mold.
3. Improper design of the cooling system
If the cooling system of the mold is poorly designed, resulting in uneven cooling, it may cause wave marks. The cooling system design should be re-evaluated in this case.
4. Improper design of gate location and shape
If the gate location and shape are improperly designed, when the melt moves from a narrow section of the runner to a larger section of the cavity, it can easily generate turbulence, leading to the formation of wave marks. Therefore, the gate should be designed in thick sections or directly on the side wall, preferably in a fan shape or film style.
5. Volatile gases produced during plasticization
Some plastic materials, such as ABS or other copolymer resins, produce volatile gases at high temperatures during plasticization, causing cloud-like wave flow marks on the surface of the plastic parts. To address this, the processing temperature can be appropriately lowered.
6. Poor fluidity
Some resins, like 个人电脑, have poor fluidity. Resins of the same brand may also differ in fluidity, and poor fluidity is often a major cause of flow marks. Therefore, resins with good fluidity should be used.
7. Insufficient lubricant in the material
If there is too little lubricant, the melt has poor fluidity, leading to flow marks. Therefore, the amount of lubricant additives should be appropriately increased.
8. Holding pressure time is too short
If the holding pressure time is too short, flow marks are likely to appear on the surface of the plastic part. This can be addressed by extending the holding pressure time.
9. The mold temperature is too low
If the mold temperature is too low, the melt flows slowly, leading to flow marks. To address this, reduce the amount of cooling water entering, and check if the mold heating system is working properly.
10. Improper injection speed
If the injection speed is too fast, the melt flows too quickly, causing turbulence in the cavity and resulting in flow marks. To address this, the injection speed can be appropriately reduced, or a slow-fast-slow graded injection can be used.
If the injection speed is too slow, the melt flows slowly, causing backflow and stagnation in the cavity, leading to the formation of flow marks. In this case, the injection speed should be appropriately increased.
Solutions for Wave Flow Marks
① Change process conditions. Using high-pressure and low-speed injection can maintain the stability of the melt flow, thus preventing the appearance of wave marks.
② Increase mold temperature. As the mold temperature increases, the fluidity of the melt improves. For crystalline polymers, a higher temperature facilitates uniform crystallization, thus reducing the appearance of wave marks.
③ Change the mold cavity structure. The structure of the mold can also cause wave marks on the surface of the product. If the edges of the mold core are too sharp, it can cause unstable melt flow, leading to the formation of wave marks. Therefore, changing the sharp edges of the mold core to a buffered transition can maintain the stability of the melt flow and prevent wave marks.
④ Change the thickness of the product. The uneven thickness of the product can cause the melt flow resistance to vary, leading to unstable melt flow. Therefore, designing the product thickness to be uniform can also prevent the appearance of wave marks.
Causes of Jetting Marks

1. Poor transition between the gate and the mold wall
If the transition between the gate and the mold wall is poor, jetting marks are likely to occur. Therefore, it’s better to use a rounded transition between the gate and the mold wall.
2. The gate is too small
If the gate is too small, the plastic will experience a high shear rate and shear stress when flowing through the gate, making small gates prone to jetting marks. Therefore, the size of the gate should not be too small.
3. Improper gate location
If the gate is directly facing a deep cavity, it is easy to produce jetting marks. Therefore, when designing the gate, it should be avoided to face a deep cavity directly, and barrier injection should be used.
4. The fluidity of the material is too high
If the material itself has good fluidity, such as PA, we should set the molding conditions according to the material characteristics.
5. Too much lubricant in the material
When too much lubricant is added, the molecular chains inside the material are relatively loose. Under high temperatures and high pressure, the fluidity of the material increases, making it easy to produce jetting marks. Therefore, we’d better reduce the amount of lubricant appropriately.
6. The injection speed is too fast
For jetting marks caused by this type of reason, it is mainly solved by lowering the initial injection speed.
7. The mold temperature is too low
If the mold temperature is too low, the front-end plastic entering the cavity can easily cool down, causing the front-end plastic to not bond tightly with the subsequent plastic, resulting in jetting marks. Therefore, we should increase the mold temperature appropriately.
8. The melt temperature is too low
If the melt temperature is too low, it is easy to produce jetting marks. Therefore, we should increase the melt temperature appropriately.
Solutions for Jetting Marks
① Change process conditions. Using high-pressure and low-speed injection can increase the flow time of the elastic melt over the same flow length, increasing the degree of elastic failure, thus reducing the appearance of radial marks.
② Change the shape of the mold gate. Enlarging the gate or changing it to a fan shape can allow the melt to recover some elasticity before entering the mold cavity, avoiding melt rupture.
③ Extend the length of the main gate of the mold. Allowing the melt to fail elastically before entering the mold cavity can also prevent melt rupture.
④ Equip with an extended nozzle. Extending the flow path of the melt before entering the mold cavity increases the degree of elastic failure of the melt, also preventing the appearance of radial marks due to melt rupture.
